
Locate the leak; check its effect on the reading
- Conditions
- Engine off, exhaust cold, vehicle safely supported. The equipment-specific method below uses regulated smoke.
- Observe
- Escaping vapor at joints or damaged pipe. Locate the leak relative to the monitored converter and rear sensor.
- Interpret
- A leak is a finding, not a P0420 diagnosis. Address it and reassess the sensor data.
Run a cold smoke check
Equipment method: Redline Smoke Pro Total-Tech 95-0050. This is separate from the shop-vacuum demonstration.
Redline 95-0050: nominal output 0.5 PSI. Engine off, exhaust cold. Wear eye protection and gloves; keep ignition sources away and remain with the equipment.
Park securely and use suitable vehicle support wherever access underneath is needed. Stop if you cannot inspect the joints safely. A different machine needs its own exhaust-test instructions; this is not a universal pressure setting.
- Check the machine has Redline-approved fluid; do not overfill or add dyes/solvents. Place it securely. Connect red to a charged 12 V battery positive and black to chassis ground, not a charger or jump pack. Connect compressed air to the machine input.
- Fit a suitable cone adapter to the tailpipe and insert the vapor hose. Seal a second tailpipe only where a connected dual system requires it.
- Press On/Off for the five-minute vapor cycle. Open the flow control counterclockwise; confirm vapor is being generated. Use the inspection light to locate escaping vapor along the exhaust.
- Identify each leak relative to the front converter and rear sensor. A warm converter can consume vapor; absence of visible vapor is not proof of no leak. End the cycle and remove test equipment before starting the engine.
Use the result
- Leak found: record its location. Address the leak and repeat the inspection, then reassess P0420; location alone does not establish or exclude the cause. Plan the leak repair →
- No leak observed with the test working and the relevant joints inspected: record that limited result, then check sensor identity and response. Continue to sensor checks →
- No vapor, blocked access or uncertain setup: record an incomplete check. Resolve the equipment/access problem before drawing a diagnostic conclusion. Record the result →
Redline’s exhaust-test instructions · Setup: printed pages 1, 2, 6–7; exhaust: page 10.
See how GoTech found the Camry’s leak
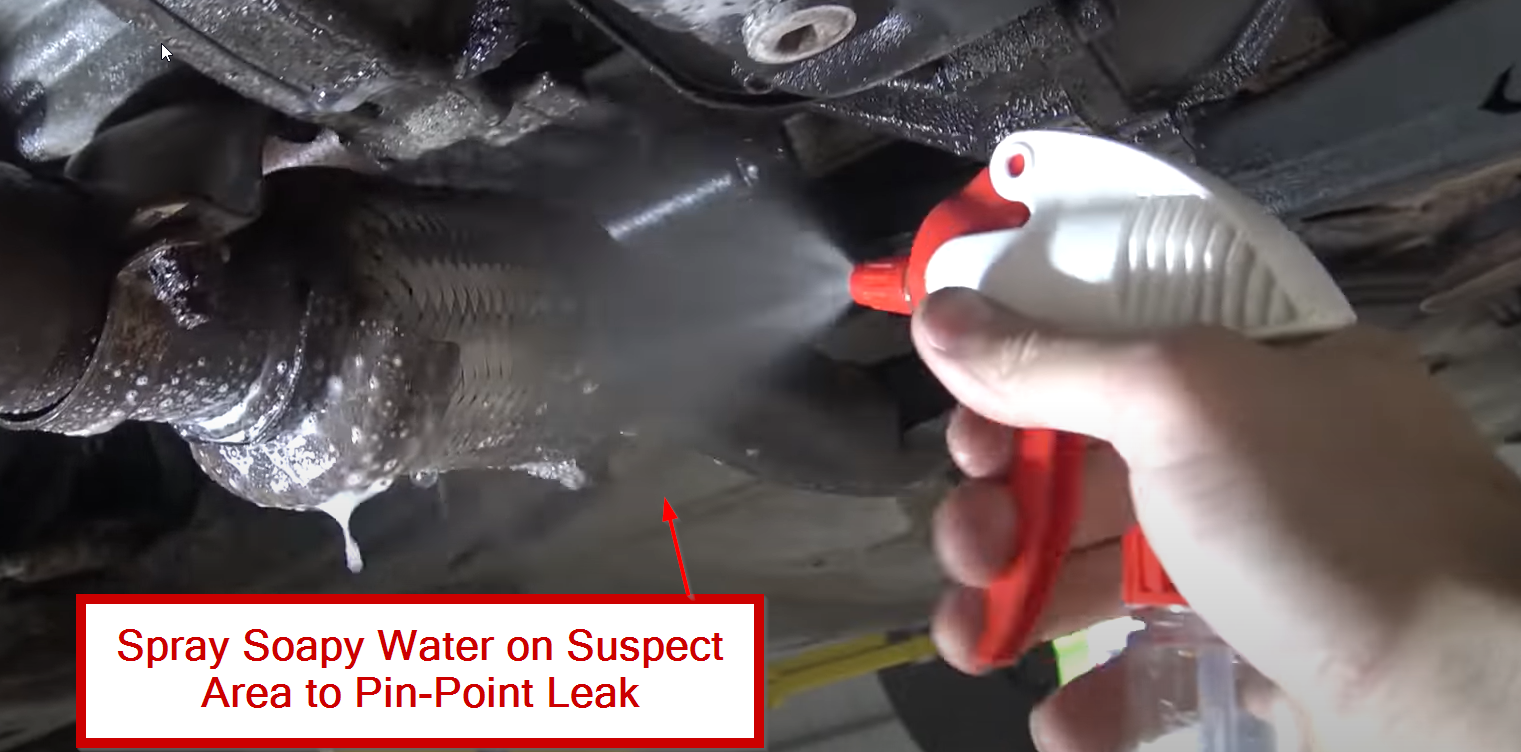
In the Camry demonstration, air and soapy water expose the flex-pipe leak after the rear sensor.
▶ Watch the leak test 2:42Equipment, access and the setup in the video
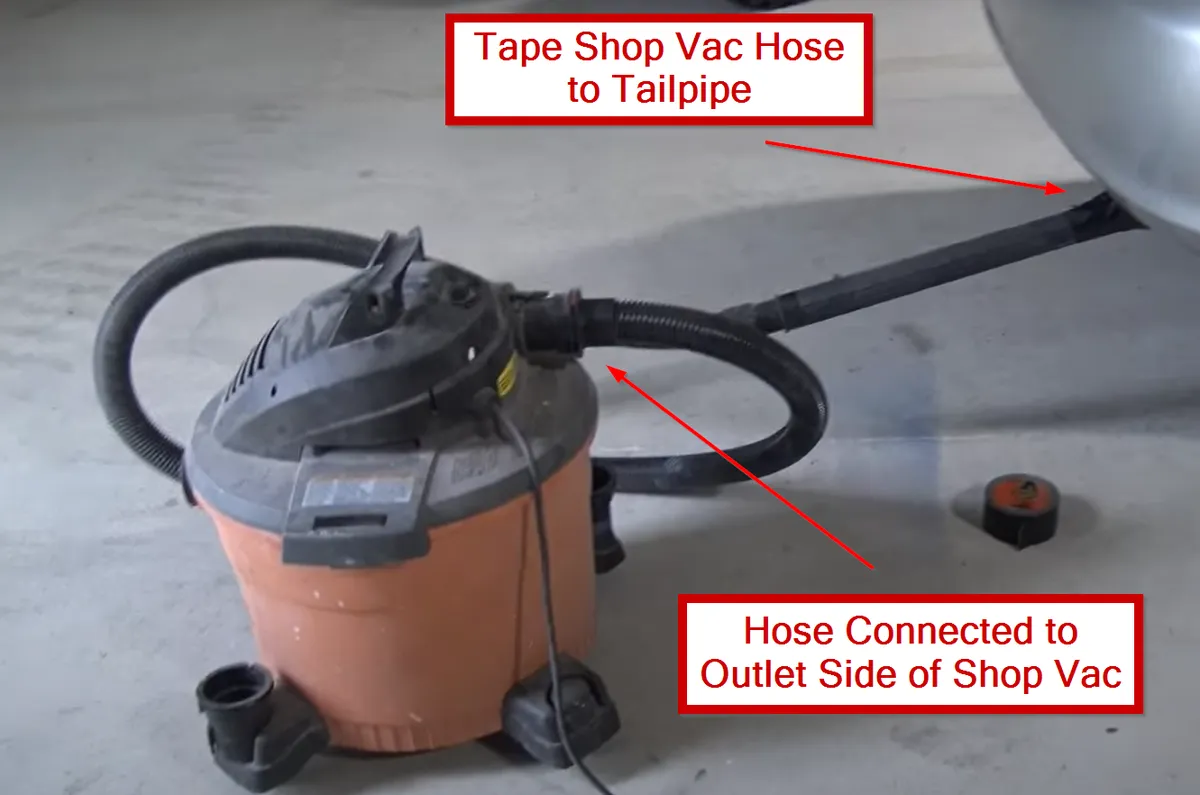
The video uses the shop vacuum’s outlet/blower hose at the tailpipe. It does not give the vacuum rating or applied pressure, so this is not a universal setup to copy.
Do not seal and pressurize the exhaust without specified equipment limits, or use a vacuum to collect fuel or hot exhaust. If you can’t confirm the equipment limits or safely reach the area, have a technician perform the check.
What did you find?
Earlier information changed. This note is retained and needs review.
Or update the answer above. This records your review, not an independent verification.
Choose a result to see your next step.
Already evaluated or addressed the leak?
Earlier information changed. This note is retained and needs review.
Or update the answer above. This records your review, not an independent verification.
Help me locate the leak relative to the sensors
Use your vehicle’s exhaust diagram to identify the monitored converter and its rear O₂ sensor. Then locate the leak before, near or after that sensor. Don’t infer the location from the sound alone.
- 01A/F sensorUpstream · mixture feedback
- 02Front catalystMonitored in this case
- 03Rear O₂ sensorDownstream of front catalyst
- 04Flex-pipe leakAfter the rear sensor
A second catalyst is farther downstream. The presenter identifies no third sensor monitoring it.
This is the Camry example. Its flex-pipe leak is after the rear sensor. The technician continues the catalyst diagnosis; your vehicle may have a different layout and test procedure.
What to confirm for your vehicle
Back to your result ↑What each result means
| What you found | What it tells you | Next check |
|---|---|---|
| Leak before or near the rear sensor | It could affect the reading. Address it using your vehicle’s procedure, then reassess. | Plan the exhaust leak repair |
| Leak farther downstream | Still assess and address the leak. Location alone does not explain or dismiss P0420. | Plan the exhaust leak repair |
| Leak found; location unclear | Identify the monitored converter and rear sensor before interpreting it. | Locate the leak |
| No leak found | None found in this inspection; leaks under other conditions remain possible. | Check sensor identity and response |
| Check not completed | The leak check remains open; no clear result was obtained. | Review equipment and access |
Save vehicle details or notes
Save or resume this job
Keep a job file to reopen your vehicle, findings, private notes and place in the guide.
Read only on this device; nothing is uploaded. A job file is plain text, so keep it with your own records.
This replaces the job in this tab. Save its file first if you want to keep both.
Private job notes
Keep the actual observations beside your selected results. Notes save as you type. A first note adds context; revising a saved note asks you to review the affected findings. Notes never select a result for you.
Full code list, symptoms, freeze-frame values and when the fault occurred.
The saved context changed. Review this note before relying on it.
Sensor / PID and units, rpm or temperature, leak location, test conditions and observations.
The saved context changed. Review this note before relying on it.
Part numbers, seals or hardware used, work performed and differences from the plan.
The saved context changed. Review this note before relying on it.
What remains to check or finish when you return.
The saved context changed. Review this note before relying on it.
Up to 2,000 characters per section. Included in your job file and copied summary; excluded from site measurements.
Your vehicle
General P0420 guidanceSave details with your findings and compare them with the Camry in the video.
Matching details select the supported Camry branch. Other vehicles retain general guidance; saving details never confirms a diagnosis or parts fitment.
Year, make, model and engine
Worked example: 2002 Camry 2.4L · California emissions.
My findings
- No results selected yet.
Copy or print a job summary
Take the current vehicle, findings, private notes, open checks and repair status with you. Scan-report attachments stay with your own records.
An exported copy will not update when you change your notes. Save a job file to reopen the editable record later.
Stage progress & skipped checks
Continue from here
Reading a stage does not record a test result.
Earlier checks and open questions
Missing notes don’t mean the work wasn’t done; a skipped step isn’t a passing test.
What changed?
Your vehicle, findings and private notes stay in this tab. Save a job file before closing it. GoTech measures page use without collecting these details.
Clear this tab’s vehicle, findings and private notes? Save a job file first to keep a copy.
Sources and what is verified
Case evidence: GoTech’s original video, published July 9, 2020, the owner-supplied subtitles, and images already in the original guide. Chapter links use the existing guide’s timestamps. Vehicle, observations and repair outcome are attributed to the presenter.
Technical context: Walker’s P0420 diagnostic guidance and DENSO’s A/F and O₂ sensor explanation, checked October 8, 2026.
Editorial preparation: AI-assisted written guide, checked against the supplied transcript and cited sources on October 8, 2026. This is a source check, not technician approval. Independent GoTech technical review is pending.
Limits: cited equipment methods and Toyota connection references have their stated scope. The complete Camry diagnostic, replacement and confirmation procedure is not yet supplied. Your vehicle’s fitment and the video’s reported emissions result have not been independently verified.
Suggested checks: GoTech’s editorial guidance combines your reported answers with the cited evidence; it does not diagnose your vehicle.