
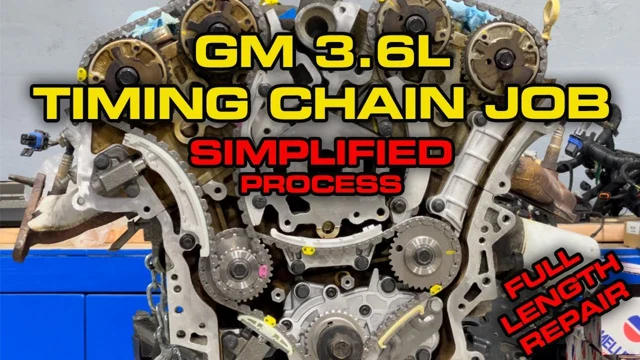
Video loads only when you choose to play.
Video chapters — choose a moment
- 0:00 · How Did We Get Here?
- 0:44 · What Parts Did We Use?
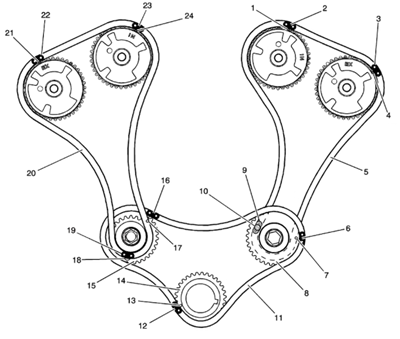
- 2:29 · Timing Chain System Explained
- 3:43 · Timing Stages Explained
- 4:49 · Setting Stage 2 Timing
- 7:22 · Remove Right Bank Secondary Chain
- 8:47 · Setting Stage 1 Timing
- 10:22 · Remove Primary Chain
- 11:32 · Remove Left Bank Secondary Chain
- 14:29 · Oil Pump Removal
- 16:11 · Oil Pump Installation
- 17:25 · Install Left Bank Secondary Timing Chain
- 23:29 · Install Primary Chain
- 31:25 · Resetting Stage 2 Timing
- 31:46 · Install Right Bank Secondary Timing Chain
- 37:25 · Checking ALL Timing Marks
- 38:55 · Verification of Proper Engine Timing
- 43:09 · Conclusion
GM 3.6L vehicle fitment & parts
The same two Melling parts below are catalog-listed for the covered 3.6L V6 (3564cc) applications. Check your vehicle and year here.
Before you start: engine, access and supplies
- Identify the installed engine. Use the VIN/build and engine code; identify the donor if the engine has been replaced.
- Plan access and reassembly. Have current service information for your vehicle, including fasteners, torque/angle values, seals and fluids.
- Prepare the required tools. The video uses camshaft holding/alignment tools during its final check. Confirm the tools and measuring equipment for your engine before disassembly.
- Review the two timing stages. Use the diagrams and complete removal/installation sequence; bank names follow the engine, not your camera view.
Both parts are listed for the applications below.
Parts used in the video
As an Amazon Associate I earn from qualifying purchases.
Melling timing-chain kit
3-753S
Includes: Three timing chains, guides, tensioners, a crankshaft sprocket and two idler sprockets.
Sold separately: Oil pump, camshaft/VVT sprockets and VVT solenoids.
Check kit price on Amazon ↗Melling oil pump
M353
Optional replacement. Add a separate pump if your diagnosis and service plan call for it.
Check pump price on Amazon ↗Before ordering: confirm VIN/build and the installed engine against the current catalog. These parts are not a complete repair shopping list.
Check the vehicle/year list below for coverage.
Vehicle coverage & year links
Melling lists both parts for these naturally aspirated 3.6L V6 applications. This is a selected list; other engines and later generations are outside this guide’s coverage.
Chevrolet Traverse 2009–2017 · 3.6L V6
GMC Acadia 2007–2016 · 3.6L V6
First-generation Acadia with the listed 3.6L engine. The redesigned 2017 Acadia is not included.
GMC Acadia Limited 2017 · 3.6L V6
2017 Acadia Limited only; do not confuse it with the redesigned Acadia.
Buick Enclave 2008–2017 · 3.6L V6
Chevrolet Camaro 2010–2015 · 3.6L V6
3.6L V6 only, not V8. Vehicle layout and access differ from the Traverse installation.
Parts sources & scope
Melling supplied both parts for the original video. The presenter names them in the parts explanation at 0:44.
Catalog coverage confirms listed parts applications, not a GoTech test-fit or identical repair access, specifications and reassembly for every vehicle.
Checked October 8, 2026: the separate 3-753S and M353 Buyer's Guides in Melling’s official catalog. The ranges here are a curated subset.
Contents: Melling’s published component lists identify the base timing set. The 3-753SVVT sheet separates the 3-753S set from added VVT sprockets, solenoids and bolts; the 3-753SK3 sheet also adds a water pump. Those expanded kits are not the 3-753S linked here.
Amazon product identities were checked separately. Current package contents, seller, price and availability are shown by Amazon. Plan vehicle-specific seals, fluids and other service supplies using current service information.
GM 3.6L timing marks: stage 1 and stage 2
The video uses stage 1 for the left secondary and primary chains, and stage 2 for the right secondary chain. Left and right follow the engine’s bank identification, not your viewing position.
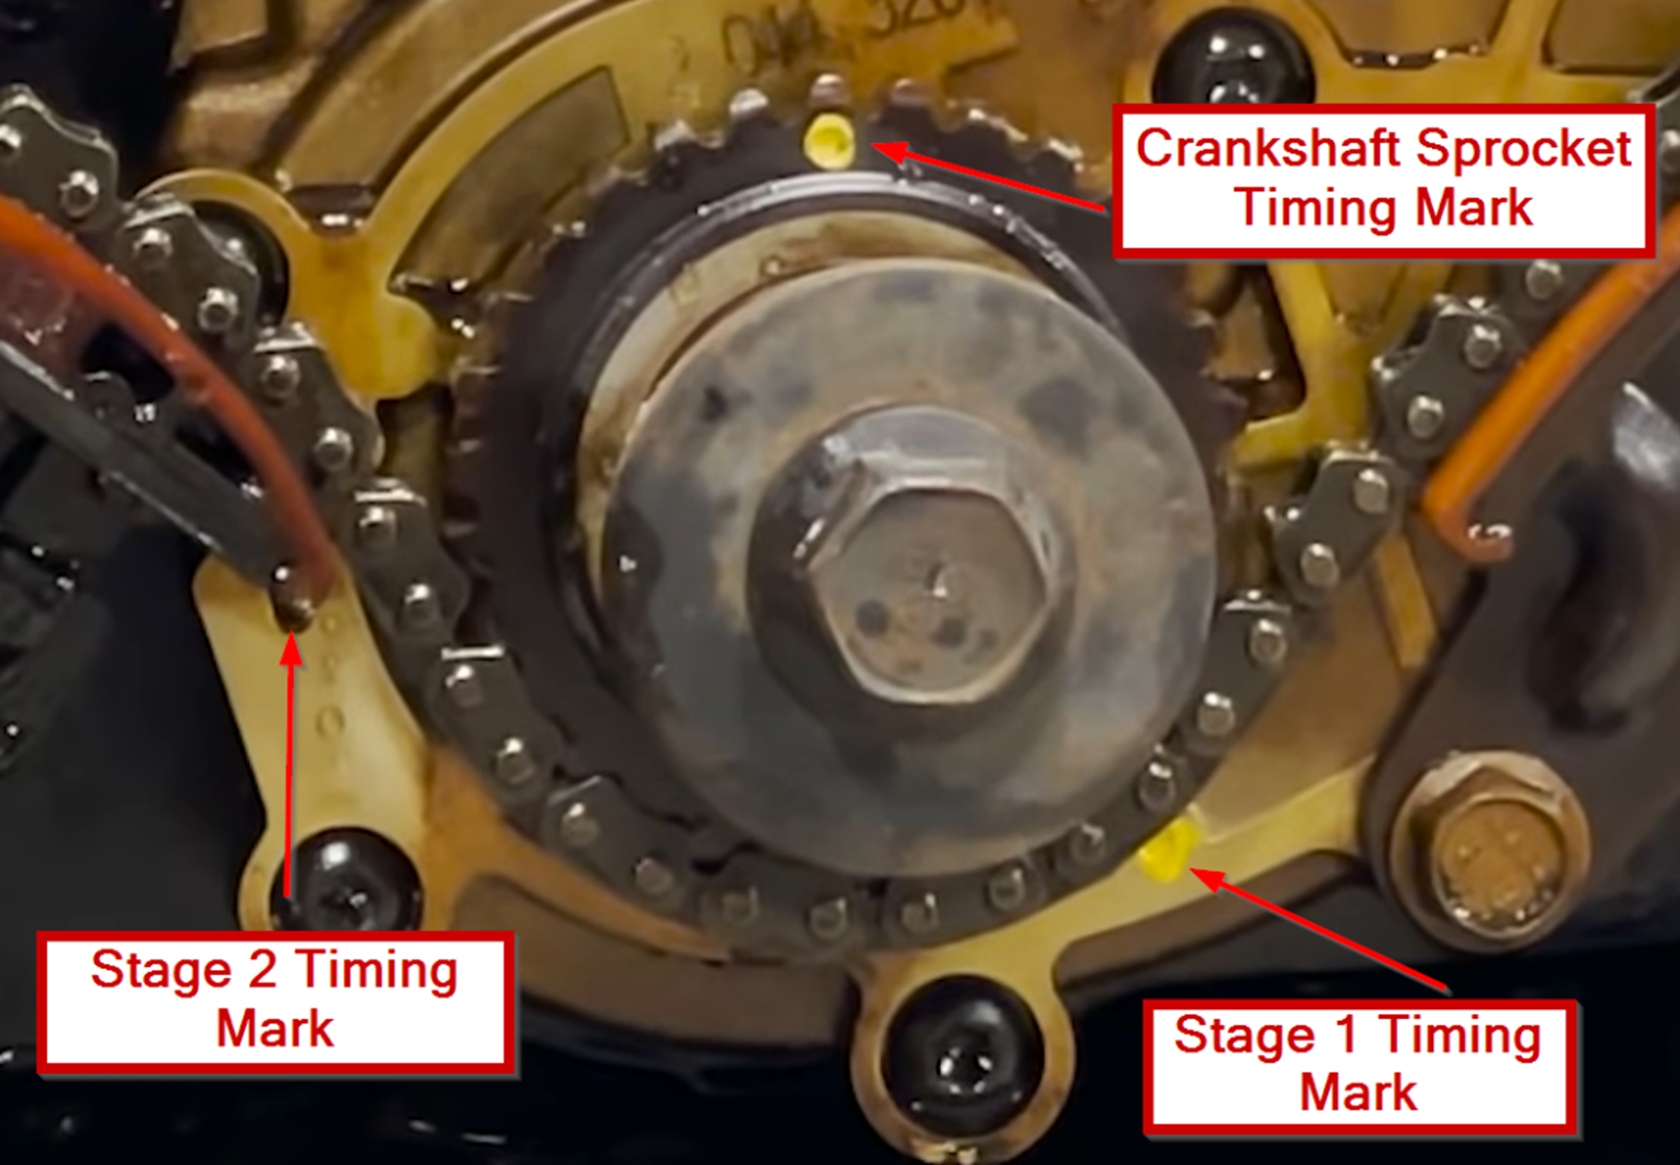
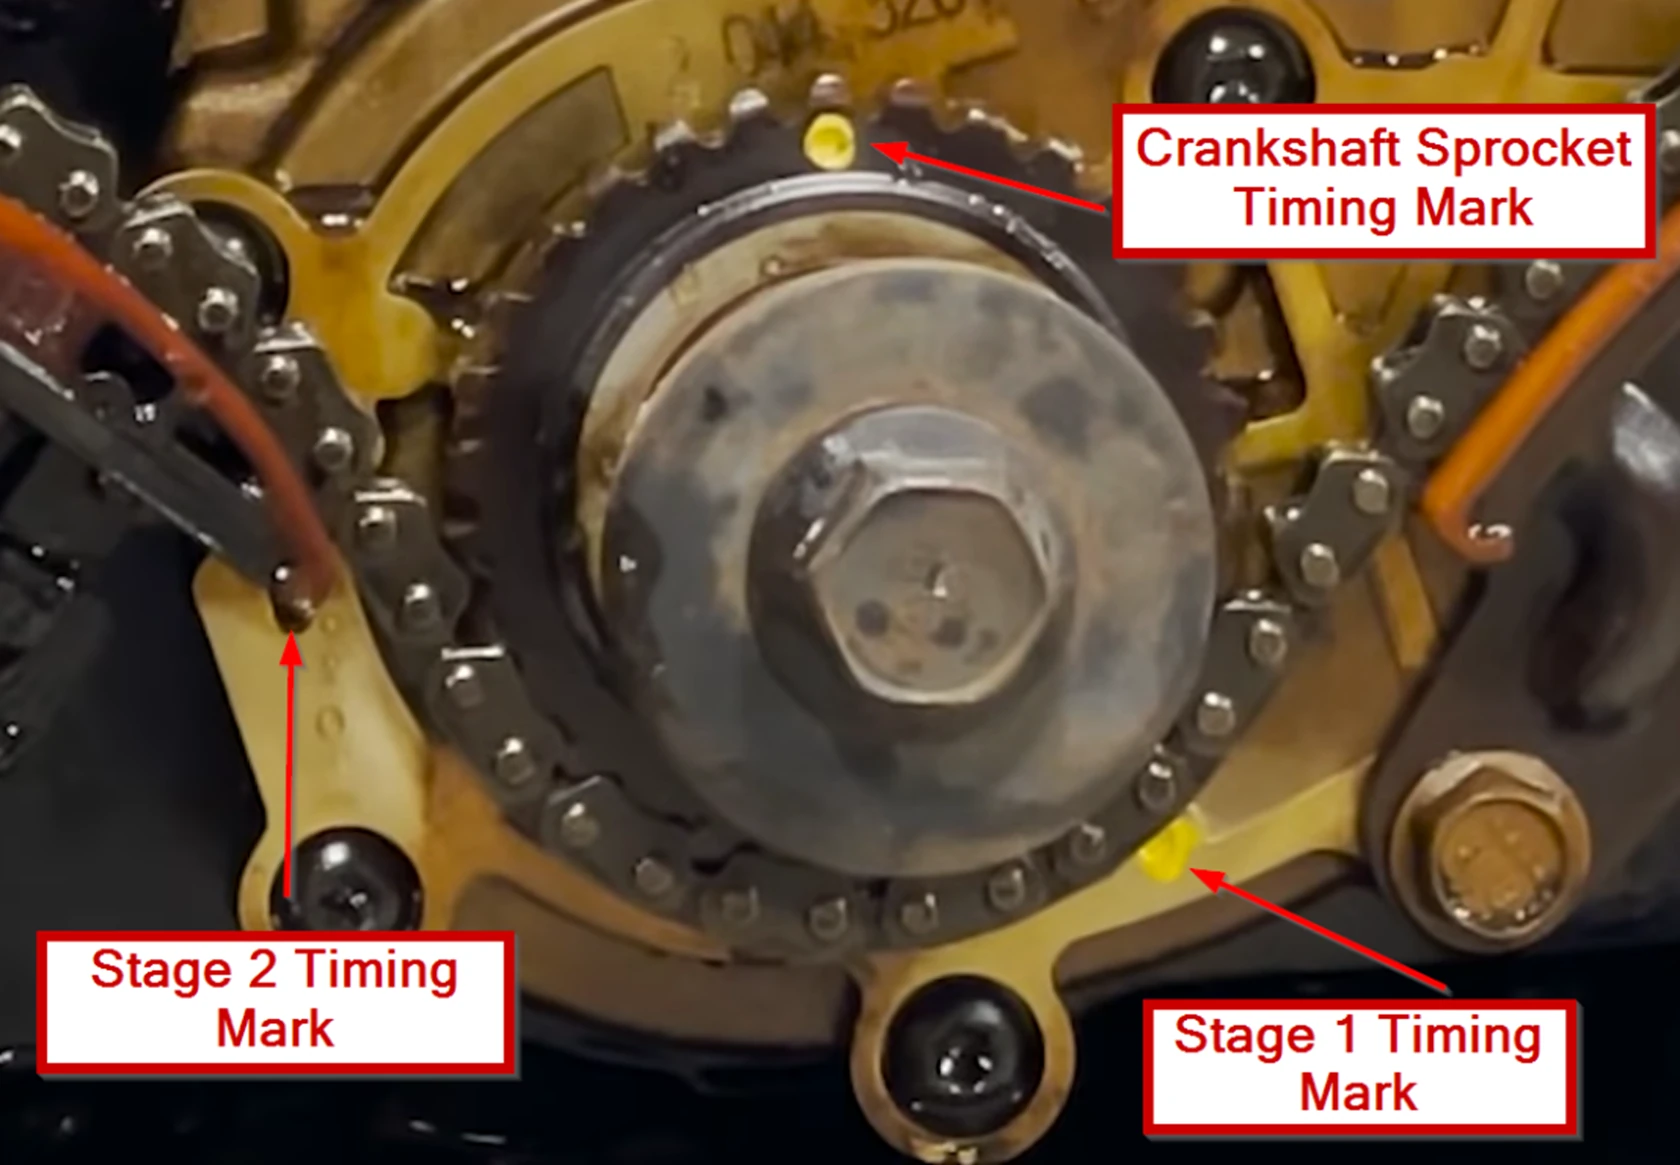
After rotating the engine: the colored links no longer line up at the recheck shown in the video. Follow the final timing checks and camshaft-tool comparison in the complete sequence below.
Where are the crankshaft and camshaft marks?
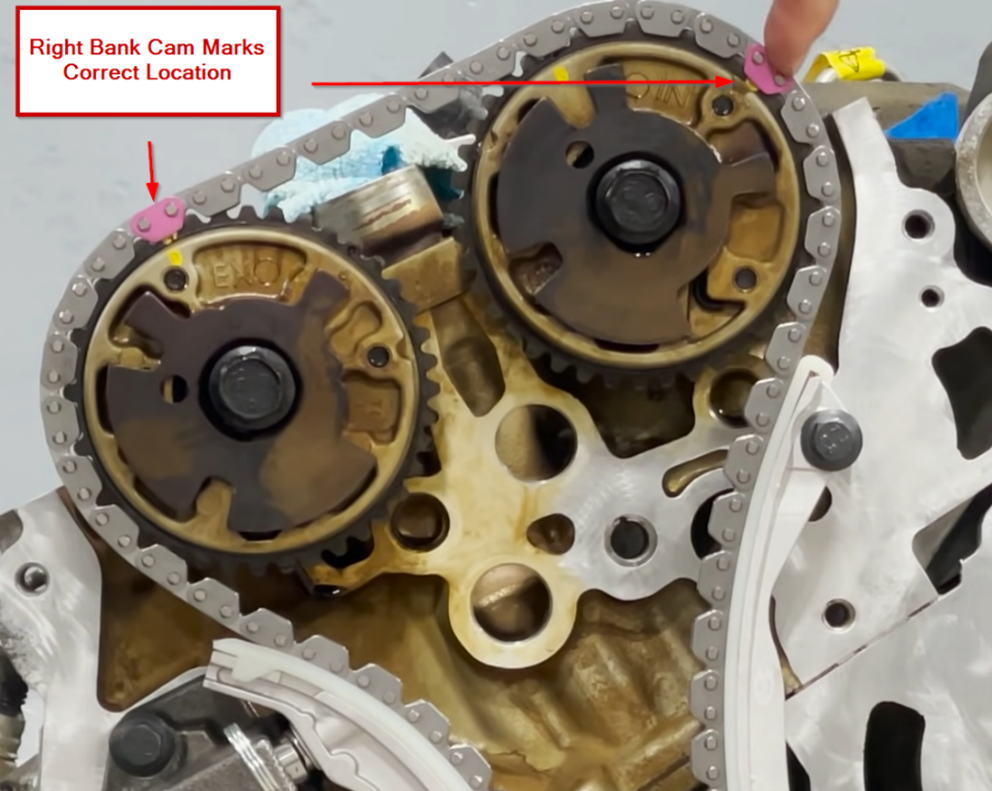
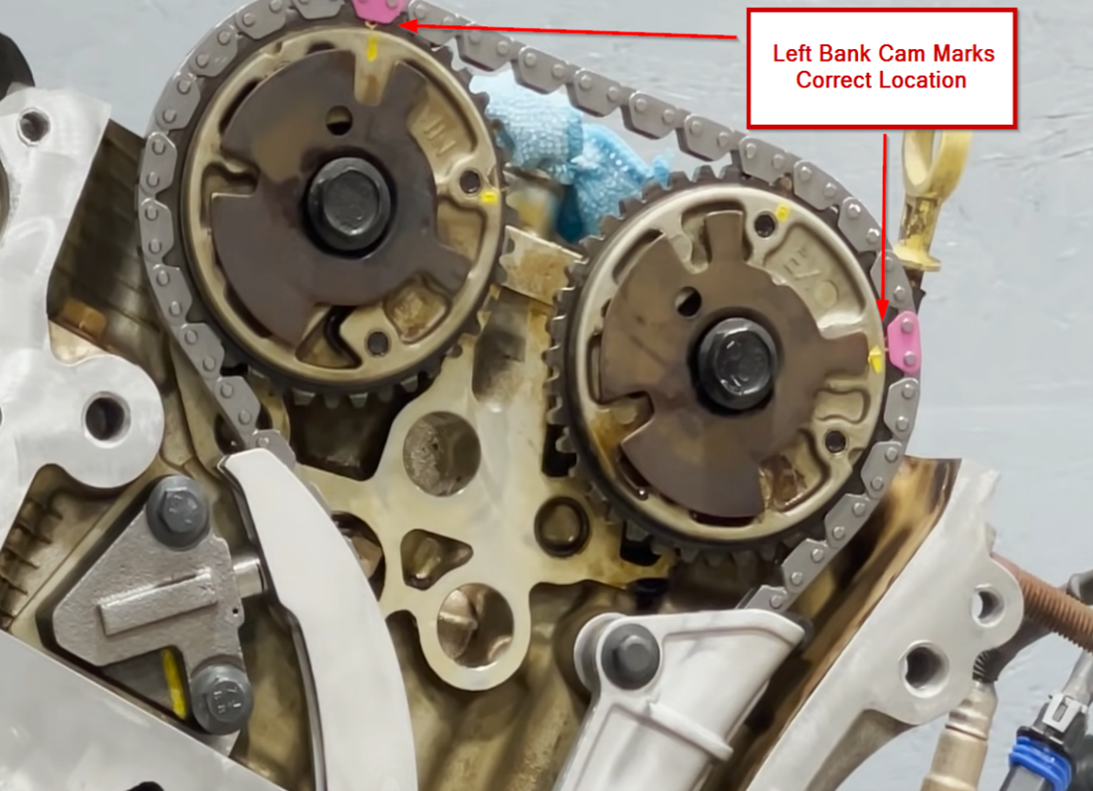
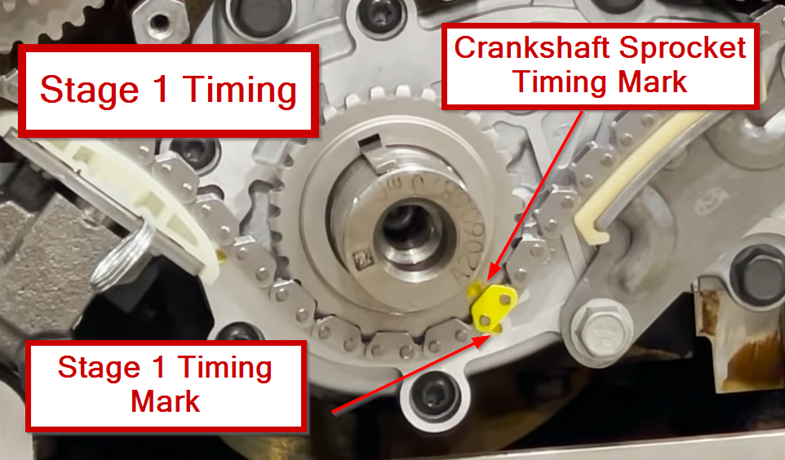
The first reference image identifies the crankshaft sprocket mark and separate stage marks. The camshaft views differ by bank and timing stage. Right-bank stage 2 view · Left-bank stage 2 view.
When does the video use stage 1 versus stage 2?
Stage 1 is used for the left secondary and primary chains; stage 2 is used for the right secondary chain. Follow the removal and installation order below. Watch the stage explanation at 3:43.
Why don’t the colored links line up after rotation?
The source uses colored links for chain installation. At the later recheck they no longer align with the sprocket marks; the video checks the timing stages and camshaft-tool fit. Follow the complete final-check sequence.
Acquire a complete timing chain kit which includes chains, guides, and tensioners for your specific vehicle make and model ↗ 0:44
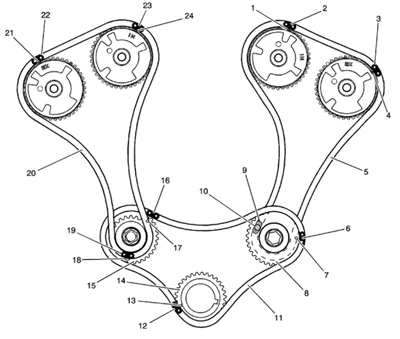
 Enlarge illustration 1
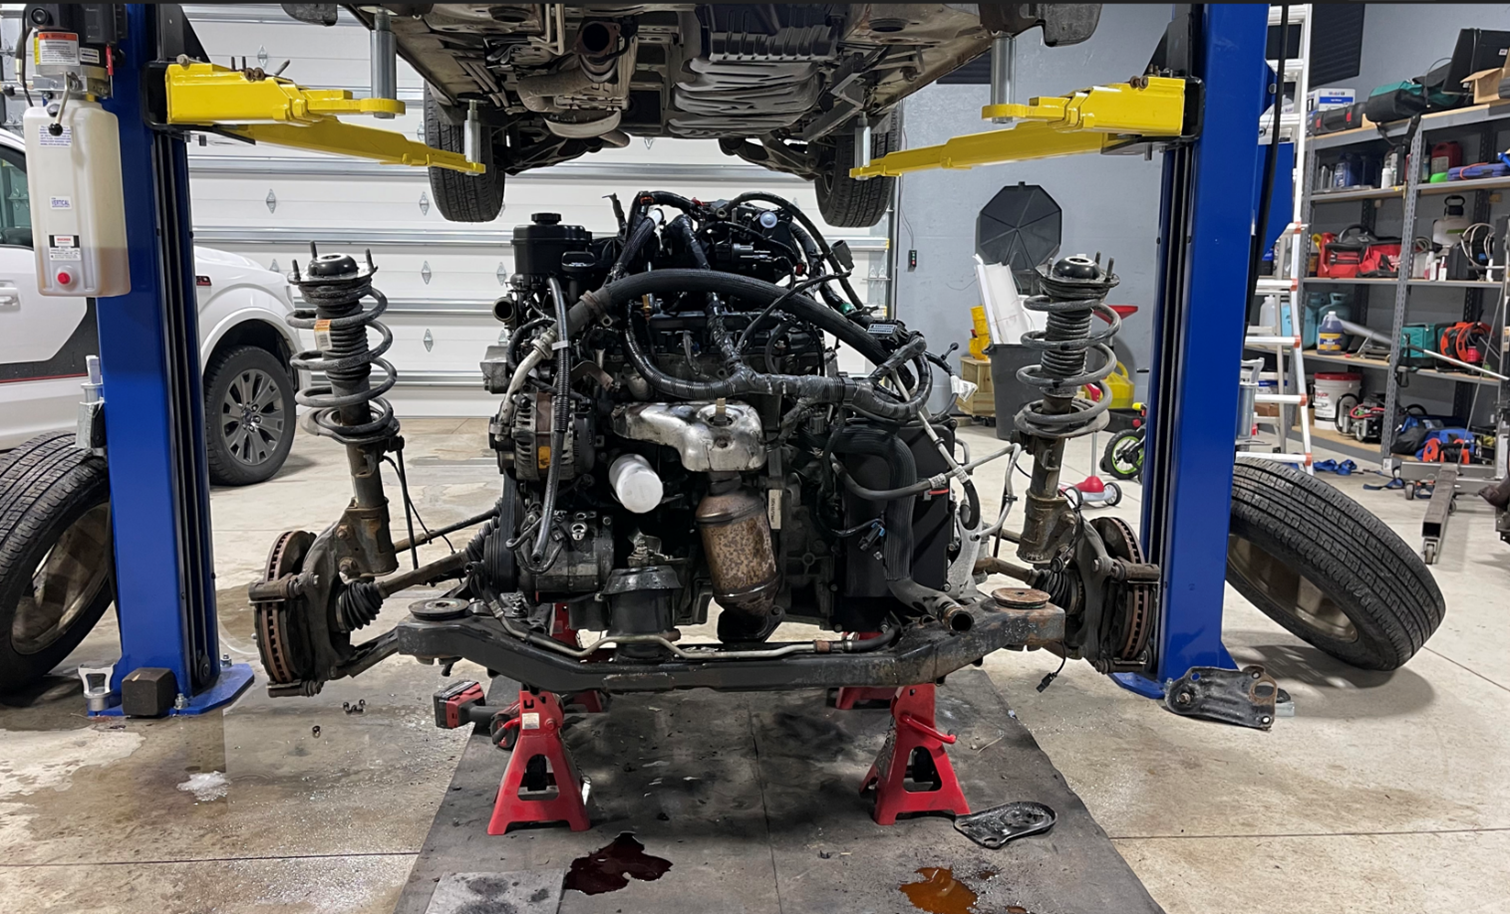
Follow service information to remove the engine timing cover to gain access to the timing chains.
Remove the spark plugs from the engine, this will make it easier to rotate the engine during timing chain service
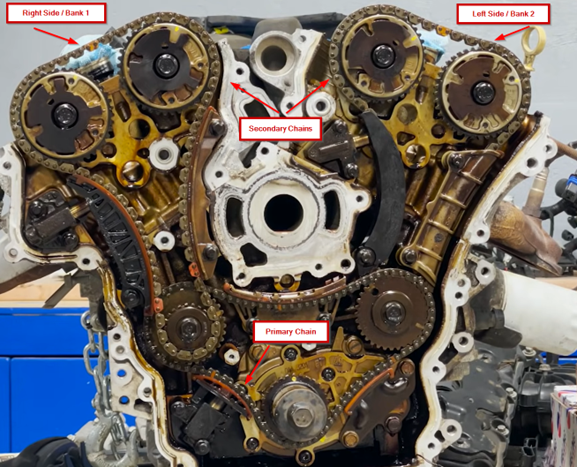
Identify which chain is the right side (bank 1) and which chain is the left side (bank 2) on your engine ↗ 2:29
 Enlarge illustration 2
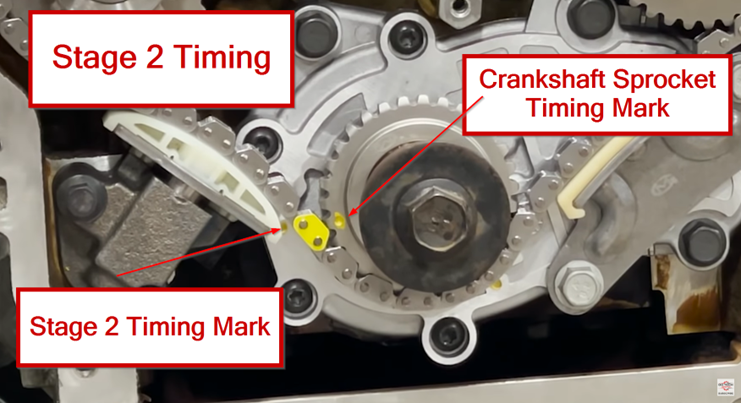
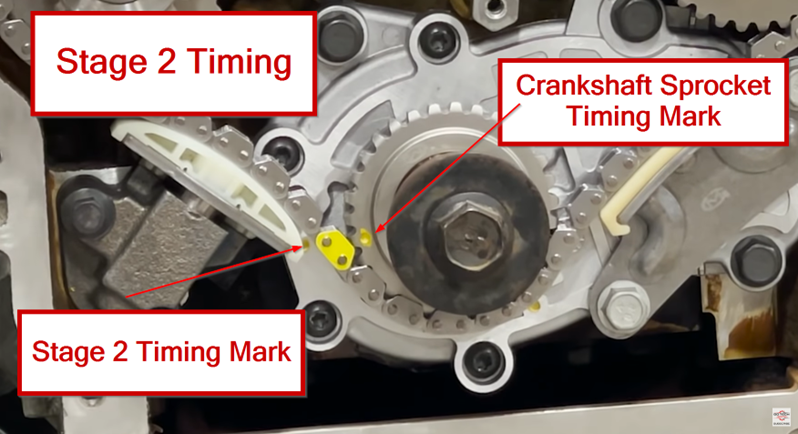
Locate the stage 1, stage 2, and crankshaft sprocket timing marks located by the crankshaft sprocket ↗ 3:43
Enlarge illustration 3Rotate the crankshaft to align the crankshaft sprocket timing mark with the stage 2 timing mark putting the engine in stage 2 timing ↗ 4:49
 Enlarge illustration 4
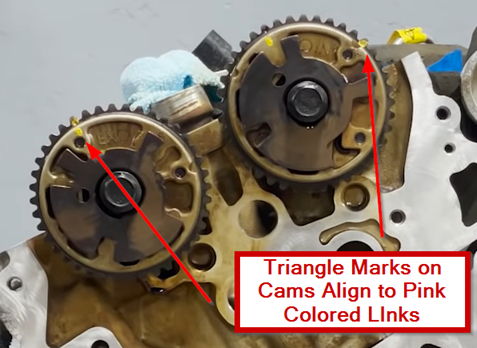
Check that the timing marks on camshaft sprockets are in the correct location for stage 2 timing, if not turn the engine over an additional 360 degrees
 Enlarge illustration 5
 Enlarge illustration 6
Remove the timing chains
With the engine in stage 2 timing, remove the right bank (bank 1) tensioner, guides, and secondary timing chain ↗ 7:22
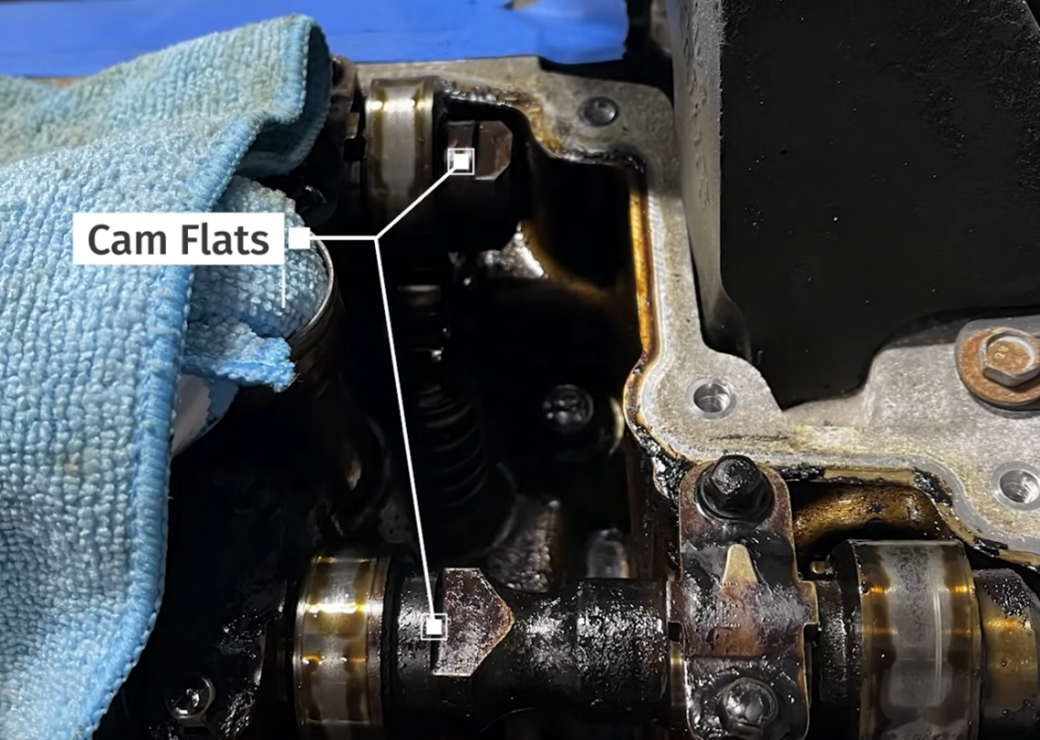
Rotate engine to stage 1 timing, make sure the camshafts flats are pointed up on the left bank (bank2) and left bank timing marks are as pictured below ↗ 8:47
 Enlarge illustration 7
 Enlarge illustration 8
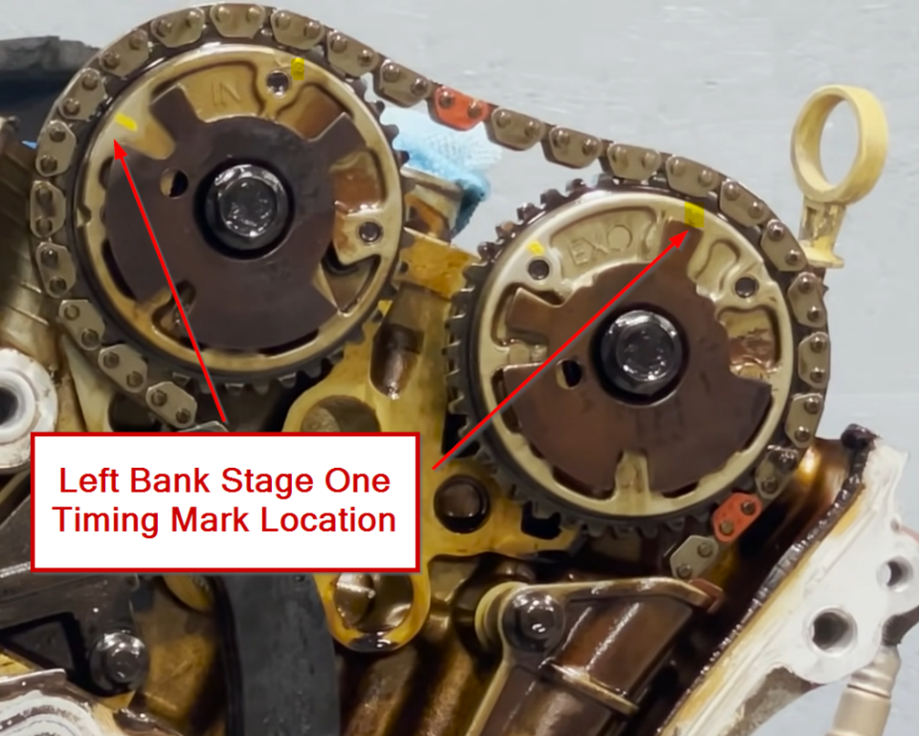 Enlarge illustration 9
With the engine in stage 1, remove the primary chain tensioner, guides, and primary timing chain ↗ 10:22
With the engine in stage 1, remove the left bank (bank2) secondary chain tensioner, guides, and timing chain ↗ 11:32
If replacing, remove both idler sprockets
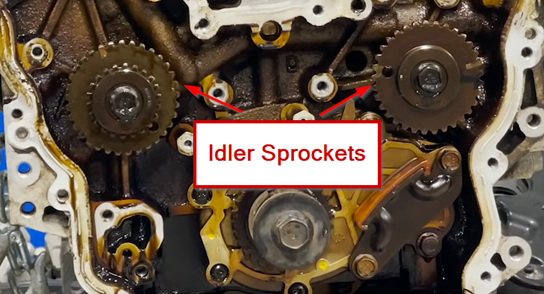 Enlarge illustration 10
Oil pump service, if applicable
Install the left-bank secondary chain
With the engine still in stage one timing, install the left bank (bank 2) secondary timing chain, aligning the pink colored links the with the correct 'L' dot marks on camshaft sprockets ↗ 17:25
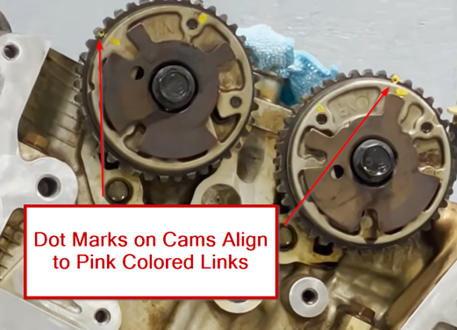 Enlarge illustration 11
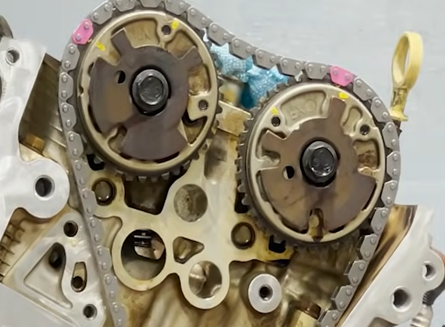 Enlarge illustration 12
Install left bank idler sprocket and torque to 43 ft lbs. ↗ 18:01
Align yellow colored link with hole in idler sprocket ↗ 19:33
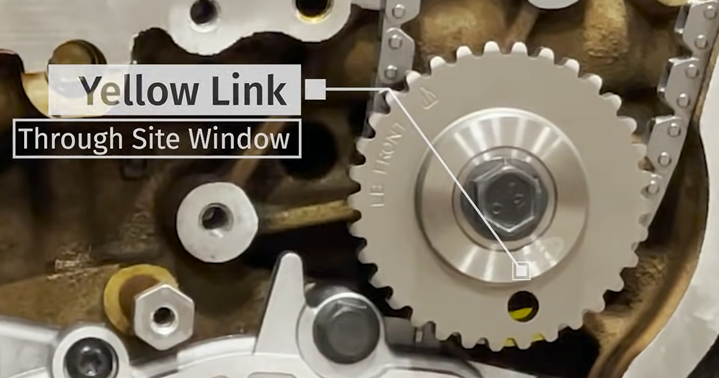 Enlarge illustration 13
Install the left bank secondary chain guides and tensioner, torque bolts to 18 ft lbs. (be careful not to let chain slip off timing marks during installation) ↗ 19:43
Recheck timing marks and pull pin on the left bank secondary chain tensioner ↗ 22:49
Idler sprocket and primary chain
Install the right bank idler sprocket torque to 43 ft lbs. ↗ 23:34
Locate the timing marks on the idler sprockets and mark them with a paint marker to ease assembly of the primary timing chain
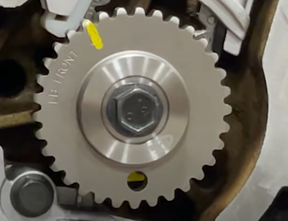 Enlarge illustration 14
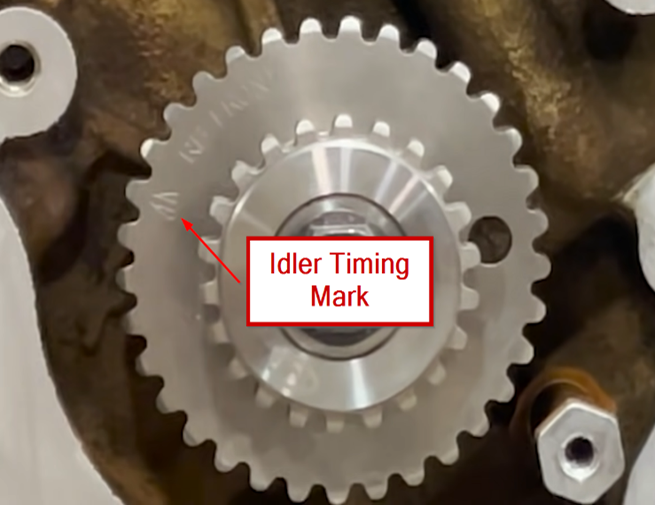 Enlarge illustration 15
Install the primary timing chain aligning the 3 yellow colored links, one on each idler sprocket timing mark and one on the crankshaft sprocket timing mark ↗ 24:35
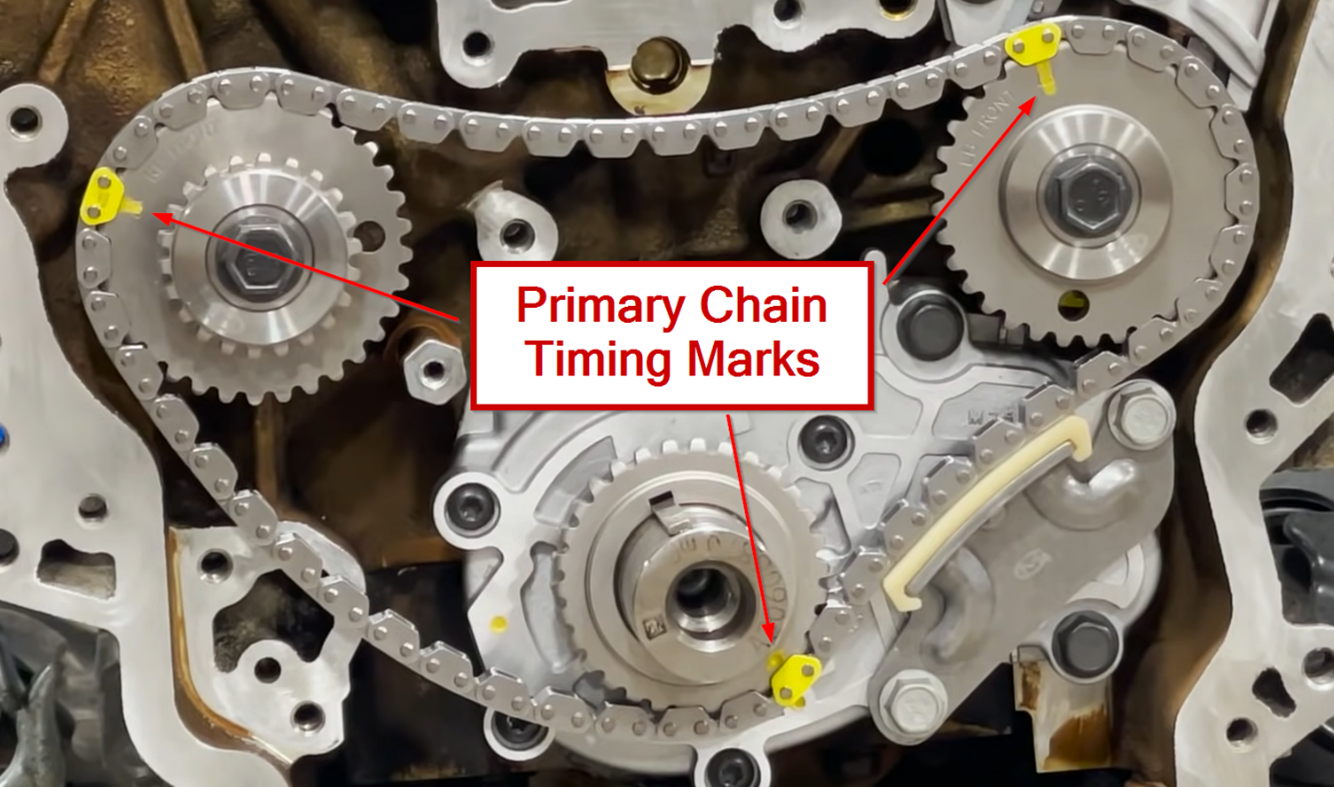 Enlarge illustration 16
Install the primary chain guides and tensioner, torque bolts to 18 ft lbs. ↗ 28:18
Recheck that timing marks are aligned and pull pin on the primary timing chain tensioner ↗ 30:13
Rotate engine to stage 2 timing ↗ 30:30
 Enlarge illustration 17
Install the right-bank secondary chain
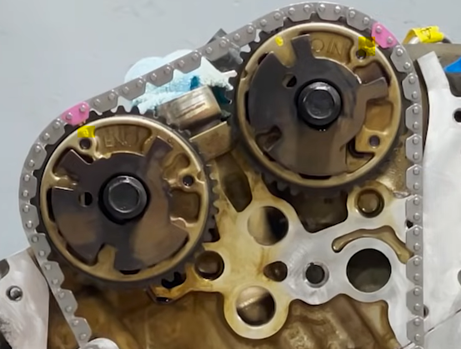
With the engine in stage 2 timing install the right bank (bank 1) secondary timing chain, aligning the 2 pink colored links to the correct 'R' triangle marks on the camshaft sprockets ↗ 31:47
 Enlarge illustration 18
 Enlarge illustration 19
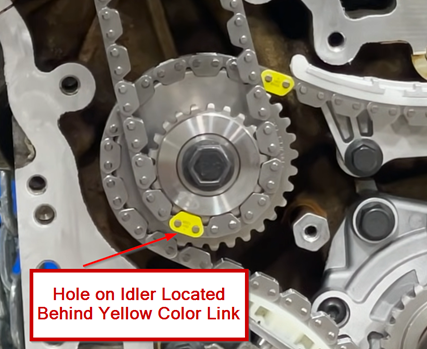
Align the yellow-colored link on timing chain to the hole in the idler sprocket ↗ 32:47
 Enlarge illustration 20
While holding chain in place install right bank (bank 1) secondary timing chain guides and tensioner, torque to 18 ft lbs. ↗ 33:13
Re-check timing marks and pull pin on right bank (bank 1) secondary chain tensioner ↗ 36:23
Double check all timing marks ↗ 37:25
Enlarge illustration 21Final timing checks and reassembly
Rotate engine over by hand and make sure the chains move smoothly and nothing is pinched or binding ↗ 38:43
Rotate the engine back to stage 2 timing and re-check timing ↗ 39:17
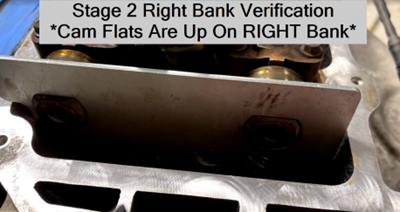
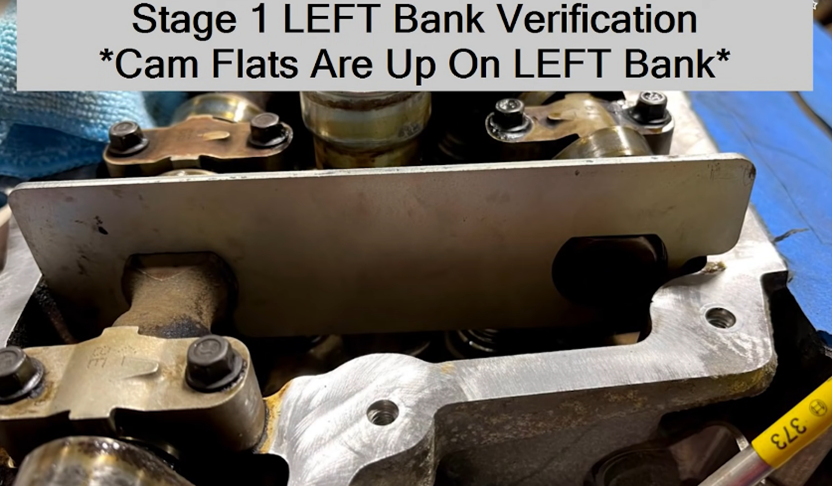
If cam tools are available, they can be used to double check cam timing in stage1 and stage 2, right bank cam flats will be up in stage 2 and left bank cam flats will be up in stage 1
 Enlarge illustration 22
 Enlarge illustration 23
Reinstall engine timing cover and all related engine components
Source and limits
Original GoTech article, 2022-06-09. Illustration captions describe the visible source images and their procedural context; technical applicability has not been independently reviewed. Videos and articles remain separate evidence.
Amazon links in the parts section may earn GoTech a commission. Manufacturer catalog fitment is sourced separately from the original article.
Article provenance
Source mdx-a93059ef053e4414a5de
SHA-256 0e4f6154b98234c6c14d8f8bf60a29fb4b8a8c54a628d2485babda2f2bb9e1d5
GoTech tips cite the original video and its automatic captions. They add no new specifications or vehicle coverage.
More on GM 3.6L timing chains
Looking into the concern before choosing a repair? Explore the related GoTech guides.